Welcome! Slack Essentials is your guide to working in Slack.
In this lesson you’ll learn:
- The types of conversations inside Slack
- How to set up your public channels
- The six traits of a successful channel
- How to move a project into Slack
But first, let’s explain that in Slack, people work together and collaborate mostly in channels, which appear on your navigation pane to the left, along with your direct and group messages. A channel is where you talk about a project, share files, assign roles and responsibilities, make decisions and much more.
You can quickly create a channel on any topic, like #proj-new-website so your team can stay connected and focused on the job at hand, in this case launching that new website on-time and on-budget! You can also add or remove people as needed, share requests across your organization, celebrate great work, etc.

The types of conversations inside Slack
There are three types of conversations in Slack, and collectively they’re flexible enough for any type of discussion you might have.
| Conversation type | Who can see/browse | Who can join |
| Public channels | Entire team | Entire team |
| Private channels | Members only | Invite only |
| Direct messages (group and 1:1) | Members only | No one |
Direct messages: One-to-one and group chats
Direct messages are 1:1 chats that are essential for getting quick questions answered. They’re akin to a talk two people might have in a small room and they work best for focused, private conversations without having to meet in person.
Meanwhile, a group DM, which can include up to nine people, is like a hallway conversation among colleagues. You might start a group DM for a one-off task, but if the conversation is something you find yourself repeatedly returning to, it’s likely better served as a channel that you can name, easily find, and search later.
Channels: Unlock productivity in Slack
In Slack, work happens in channels, which are key to organizing your work into focused, easy-to-find conversations. A channel could be the dedicated home for a particular topic, team, or project. Think of channels like organization-wide meetings, or small meetings open to anyone. In channels, anyone can ask questions or submit ideas, and those discussions are open to the entire group.
Channels can easily be searched by anyone in your workspace. So if people want to read a proposal that launched a project, they can search and find information without having to ping others—along with all the context of conversations that surrounded its approval. Over time, as information gets posted in public channels across a workspace, the more valuable this access becomes. That’s why we suggest defaulting new channels to public and reserving private channels for specific purposes.

Public channels help everyone work together transparently; conversations and work are all accessible and searchable. This means that:
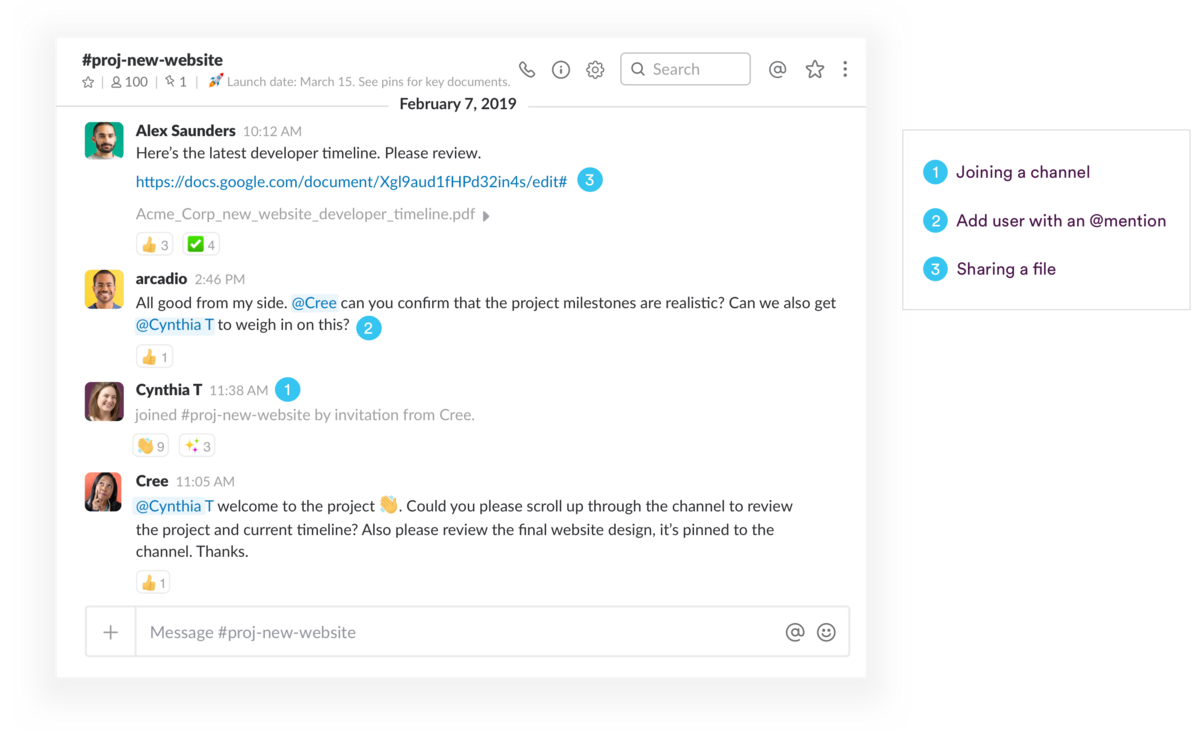
- You can join a project already underway and scroll up to see initial brainstorming, early planning, and approved deadlines that were set before you arrived.
- Using an @mention, you’re able to loop in anyone within your organization who you need input or answers from to keep your projects moving forward. Coworkers will benefit from seeing all of the context of the conversation and chime in (and then step out, unlike email) when needed.
- Information, files, and conversations are no longer locked up in any one person’s email inbox, and when someone leaves your team or channel, all the information they contributed stays put.
Private channels: Collaborating on sensitive matters
Private channels are available only to invited members, with a lock icon 🔒 next to the name of the channel. Others in the company cannot browse or find them otherwise.
When you need a confidential space for your team to come together, a private channel can serve you well. Recruiting and human resources teams use them to discuss job candidates and compensation packages confidentially before selecting hires; the same often goes for financial and legal teams that frequently discuss sensitive topics.
How to set up your public channels
While Slack launches with only a handful of default channels, you can add as many as your team needs. But remember, not everyone is in a channel by default (even the public ones). Anyone in a Slack workspace can join or leave channels as they see fit, and it’s quite OK to follow just the channels that align closest to your areas of expertise and workload.
When and why to start new channels
A great first step in your new Slack workspace is to start creating channels for specific projects and purposes.
You may also want to create channels based on topics (#finance or #building-security) or subteams within your organization (#legal or #retail-staff). One of the most popular ways to use Slack is to create a channel for every project taking place in your organization. That way, anyone in the company will have a dedicated, interdisciplinary space to chronicle all the work involved over the life of a project.
The six traits of a successful channel
There are six things every channel should have—no matter the type of work or conversations taking place within them.

1. Consistent naming conventions
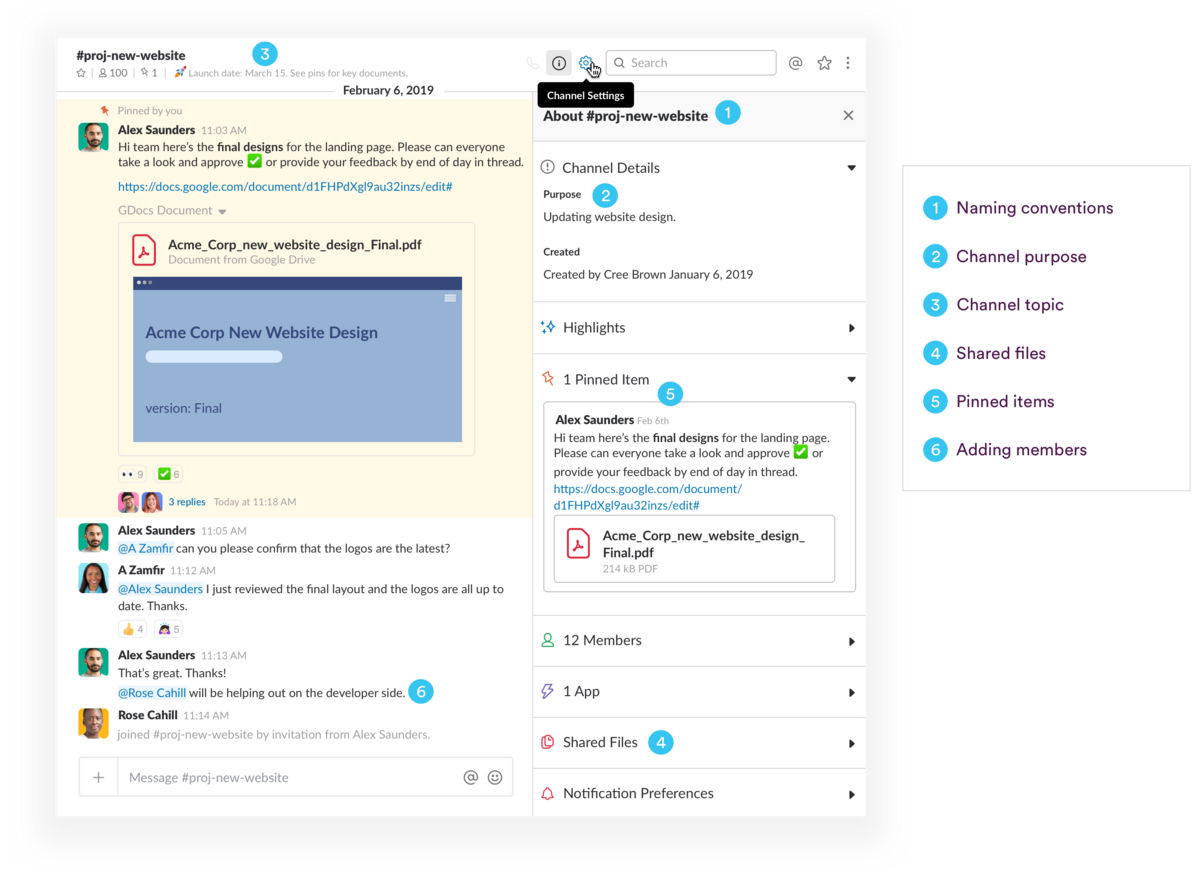
The best way to make sure everyone can find channels and the information they contain quickly is to draft naming conventions for your channels—and stick to them. Here are a few examples to get you started.
Set prefixes for the types of channels you create so that related channels will group together (they’re listed alphabetically) and your teammates can easily find relevant channels using search. Write down your channel naming conventions in a document and pin it to your #general channel, then make an org-wide announcement that points to it.
2. A clear channel purpose
Add a descriptive channel purpose that lays out why the channel was created (ex: “This is where we talk about our account with the Acme Corp”).
3. A channel topic that gives members direction
Set a channel topic that lays out what everyone is currently working on (ex: “Working on the Q2 contract for Acme.)
4. All relevant files are shared in channel
Upload any foundational files involved in the topic or project and post a welcome message to kick things off. You upload files the same way you would to an email, by clicking the paperclip icon in your message window. You can forward important emails to the channel as well.
5. Key files and information are pinned
Pin those files and messages to the channel so that at any point in the future new members can find them easily. “Pins” are simply messages or documents you want to keep in one place for easy reference. Here’s a detailed how-to on pinning.
6. A room full of teammates
To invite someone to your channel from your desktop:
- Open the channel you’d like to add someone to.
- Click the add people icon in the top right.
Here’s more on adding people in Slack, including mobile instructions.
Try it yourself: Move a project into Slack
The best way to test the waters in Slack is getting everyone to install the Slack desktop and mobile apps, then agree to use Slack only for one specific project. This means:
- Having all your discussions about the project in Slack
- Sharing any relevant files in the channel, such as status-tracking sheets, schedules, and mockups
- Posting meeting summary notes and key updates in the channel
Getting your team started in Slack is easy once you’re familiar with how to organize your work and team. With a little forethought and planning, you can set your colleagues up for success and bring a new way of working transparently to your organization.


