Table of Contents
What is Nslookup?
First, let’s talk about what Nslookup is – it is a small but very powerful network administration command-line software. It has a simple interface, but it is useful. The Nslookup command is available on many of the popular computer operating systems like Windows, macOS, and Linux distros. You can use it to perform DNS queries and receive: domain names or IP addresses, or any other specific DNS Records.
There are Nslookup online tools too. You can access such a site full of online network tools and search for the option for nslookup. You can define your query for a specific DNS record, to identify the domain, the port in use, and timeout in seconds. For better security, we recommend you to use the software on your computer.
If you want high speed, you must use Anycast DNS services! Check this article about Anycast DNS!
How does Nslookup work?
Nslookup operates by sending queries to DNS servers to retrieve information about domain names, IP addresses, and other DNS records. When a user enters a command in Nslookup, the tool sends a DNS query to a DNS server specified by the user or the system default. The server then processes the query and responds with the requested information, such as IP addresses associated with a domain name or the domain name associated with an IP address. Nslookup uses the DNS protocol to communicate with DNS servers, utilizing both UDP and TCP protocols depending on the query type and size. By analyzing the responses from DNS servers, Nslookup commands help users troubleshoot DNS-related issues, gather information about domain names, and diagnose network problems effectively.
Ready for ultra-fast DNS service? Click to register and see the difference!
How to install the Nslookup command?
Nslookup command is present on most operating systems like Windows, macOS, and most Linux distributions. However, in case it is not on the Linux distro you have chosen, or you have previously uninstalled it, you can install it following these steps:
1. Check what distro do you use. We will show you how to install the Nslookup command on Ubuntu, Debian, Linux Mint, Kali Linux, CentOS, Fedora, Red Hat, Arch Linux, and Manjaro.
2. First, open the Terminal. You will need to have administrative privileges or be a sudo user. Based on the distribution you have, use one of the following commands.
For Ubuntu, Debian, Kali Linux, and Linux Mint:
$ sudo apt-get update
and then:
$ sudo apt-get install dnsutils
For CentOS, Fedora, and Red Hat:
$ sudo dnf install bind-utils
For CentOS, Fedora, and Red Hat (Earlier versions):
$ sudo yum install bind-utils
For Arch Linux and Manjaro:
$ sudo pacman -S dnsutils
3. Now, you are ready to use the Nslookup command on your device and try the examples below.
How to use Nslookup?
Nslookup commands are simple and easy to use, requiring only a basic understanding of the command-line interface. Follow these simple steps to utilize it effectively:
- Open Command Prompt or Terminal: Nslookup commands are executed via the command-line interface. Open Command Prompt on Windows or Terminal on macOS and Linux.
- Enter Nslookup Command: Type “nslookup” followed by the domain name or IP address you want to query.
- Interpret the Results: Nslookup will provide information such as the IP address of the queried domain, its authoritative DNS server, and other associated DNS records.
- Use Specific Options (Optional): Nslookup offers various options to refine your query. For instance, adding “-type” followed by a record type (like A, MX, NS) allows you to retrieve specific DNS record types.
- Exit: Once you’ve obtained the desired information, you can exit Nslookup by typing “exit” and pressing Enter.
Nslookup syntax
The Nslookup syntax is very simple, and you can use it the same on different OSes.
nslookup [-option] [name | -] [server]
Options. First, you will put the option you want to use with the domain name or IP address. The option can be related to the type of DNS record, timeout, a port in use, debugging, or another.
Name. Here you will put the hostname (domain name) or IP address. It is the target of your DNS query.
Additional Options. Depending on the query, you can add an extra option as a parameter.
Server. You can use the default server for your query or specify another one from where you want the DNS query to be performed.
Nslookup: command not found – how to fix it?
It is possible when you try to use the Nslookup command that you get an error saying that the command is not found. Don’t worry. The problem of missing the Nslookup command can be solved in a very simple way.
Nslookup is a part of the BIND utilities, together with two other popular commands – Dig command and Host command.
If the service was stopped, you would need to restart your Linux computer, and it will be running again.
In case that it is not working because it was deleted or missing. Please follow the steps from the previous part on “How to install Nslookup command”. After the installation, you will be ready to use it.
Here are the 10 most used Nslookup commands that will help you to understand better your domain’s management:
1. How to find the A record of а domain.
You can use this command to see how many A records are there and see the IP Addresses of each one.
Command line:
$ nslookup example.com

Searching for a great Managed DNS service? Test ClouDNS for free!
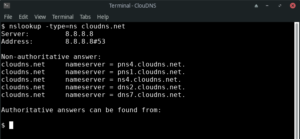
2. How to check the NS records of a domain.
By checking the NS records, you can see which is the authoritative server for a specific domain.
Command line:
$nslookup -type=ns example.com
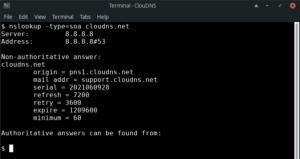
3. How to query the SOA record of a domain.
With this one, you can see the start of authority and get information about the zone.
Command line:
$nslookup -type=soa example.com
30-day Free Trial for Premium Anycast DNS hosting
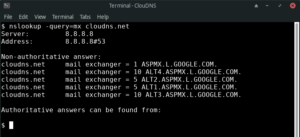
4. How to find the MX records responsible for the email exchange.
Here we are checking the MX records of the mail servers. You can see if all the mail servers are working well.
Command line:
$ nslookup -query=mx example.com
5. How to find all of the available DNS records of a domain.
This lookup has a large scope. Here we want to see all the available DNS records. After seeing all of them, we can do specific lookups for different types of DNS records.
Command line:
$ nslookup -type=any example.com

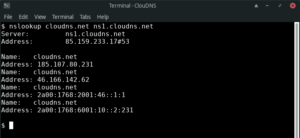
6. How to check the using of a specific DNS Server.
Apart from checking DNS records, you can use the Nslookup to review a particular DNS server and how it works. You can check if it is active or if it responds on time.
Command line:
$ nslookup example.com ns1.nsexample.com
7. How to check the Reverse DNS Lookup.
Many times you check the A records to see the IPs of a domain, but sometimes you need to verify if an IP address is related to a specific domain. For that purpose, we need a reverse DNS lookup.
Command line:
$ nslookup 10.20.30.40

8. How to check for a PTR record?
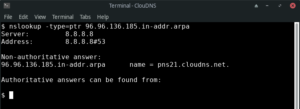
You can verify if an IP address belongs to a domain name by performing a reverse DNS query. For this purpose, you will need to check the PTR record that links an IP address to a domain name. You will need to put the IP address in reverse (185.136.96.96 changes to 96.96.136.185), and you need to add in-addr.arpa because it is stored in arpa’s top-level-domain.
Command line:
$ nslookup -type=ptr 96.96.136.185.in-addr.arpa
9. How to change the timeout interval for a reply.
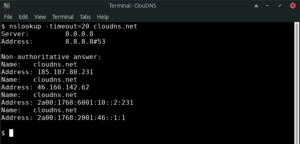
You can manually choose the timeout time in seconds. You can increase it to give more time for the server to respond. You can also shorter it to see which servers can respond quicker.
Command line:
$ nslookup -timeout=20 example.com
10. How to enable debug mode.
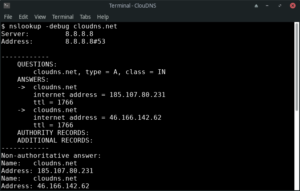
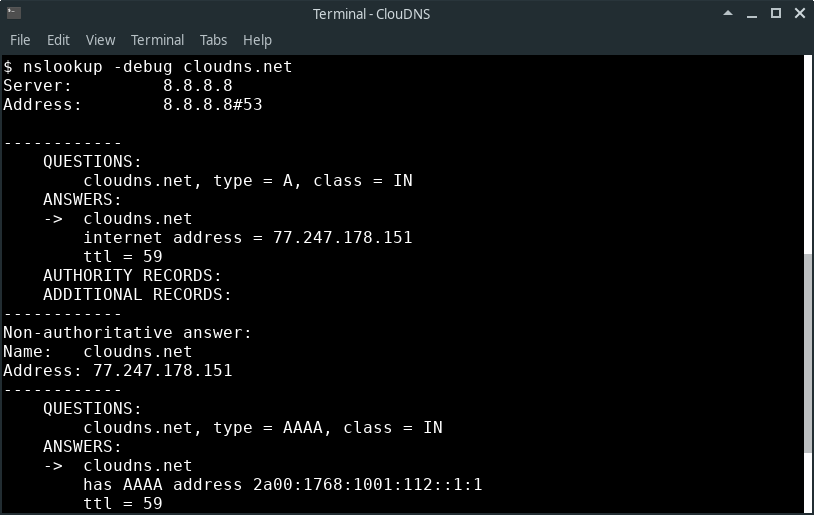
Debug mode provides important and detailed information both for the question and for the received answer.
Command line:
$ nslookup -debug example.com
Why do you need it?
The Nslookup commands are very popular and powerful tools. So, it is not a surprise that a lot of administrators use it for testing and troubleshooting their networks. There are two main reasons why you need the Nslookup command.
- The first one is obviously for troubleshooting server connections. Thanks to its beneficial functionalities, you can get the information you need quickly. In addition, it is extremely easy to use, and it is available on every operating system (OS).
- The second reason is not so obvious, but it should not be neglected. That is security and safety. It can be helpful for protecting against different phishing attacks, which involve falsifying a domain name. Attackers use a misspelled domain name or trick users by adding or omitting a hyphen. Some examples are when they replace the numeral 1 for a lowercase l (examp1e.com), or the phishing domain could be insta-gram.com instead of instagram.com. These tactics are used to trick regular users and make it seem that an unfriendly site looks friendly and familiar. Nslookup can also help to prevent another malicious attempt – DNS cache poisoning. With this attack, criminals place fraudulent data and distribute it to the DNS recursive servers, pointing to a fake authoritative server.
Nslookup command alternatives
Nslookup is one of the popular command-line software for DNS probing. You can use it to monitor your network and spot problematic areas. If you are interested in similar tools, you can see Dig, and Host too. You can use them together or find one that covers all of your diagnostic needs.
- Dig: Also known as Domain Information Groper, Dig command is a flexible tool for interrogating DNS name servers. It performs DNS lookups and displays the answers returned from the specified name server that are essential in diagnosing DNS servers.
- Host: The host command in Linux is a simple utility for performing DNS lookups. It’s designed to convert hostnames to IP addresses and vice versa. It can also discover more specific DNS records, such as MX records for mail servers.
Dig vs Nslookup
Both Dig and Nslookup are command-line tools used for DNS troubleshooting and querying. However, they differ in their functionality and output.
Dig is a flexible and robust tool that provides detailed DNS information, including authoritative name servers, IP addresses, TTL (Time to Live), and various DNS record types such as A, AAAA, MX, TXT, and more. It offers more extensive functionality and supports advanced DNS features like DNSSEC (Domain Name System Security Extensions). Experienced system administrators and network engineers commonly prefer to use Dig due to its comprehensive output and advanced capabilities.
Nslookup, on the other hand, is a simpler tool that primarily focuses on basic DNS queries. It primarily retrieves IP addresses and DNS records associated with domain names. It may lack the advanced features and flexibility of Dig , but it provides a simple interface for quick DNS lookups and basic troubleshooting tasks. Nslookup is a great tool for beginners or for quick DNS lookups without the need for in-depth analysis.
Nslookup vs Ping
Though Nslookup and Ping fall under the umbrella of network administration tools, their functionalities differ. Nslookup is a built-in network command-line tool that debugs and finds information about your network, specifically your domain name servers (DNS). This includes the establishment of domain names or IP address mapping alongside any DNS-specific records.
On the flip side, Ping is essentially a diagnostic tool intended to test your network connectivity. It’s used to verify whether or not a host is reachable in a network by sending ICMP echo requests and waiting for a response. The main purpose of Ping is to measure round-trip time for packets sent from the source host to a destination computer.
Want to check your network connectivity? Try ClouDNS ICMP PIng monitoring service for free!
Nslookup vs WHOIS
Both Nslookup and WHOIS prove quite useful in retrieving network database information but they function on different levels. Nslookup operates as a query-oriented command used to access domain name servers and DNS-related details, such as an IP associated with a specific computer or domain name.
Meanwhile, WHOIS operates as a protocol used to query databases that record registered entities or assignees of an Internet resource. This includes domain names and IP address blocks. However, unlike Nslookup, WHOIS does not possess the capacity to access DNS servers. It’s primarily employed to identify the owner or registered user of a domain, and to obtain contact information associated with the domain, an IP network, or an autonomous system.
Conclusion
The Nslookup command is a great utility that offers many functionalities. One of its main advantages is that it is available for all kinds of operating systems, like Windows, Linux, and macOS. In case you do not have it already, you can install it in several easy steps. When you are ready, you can start testing your network easily and quickly! The Nslookup command is amazing and stands out among the DNS probing commands!
Notes:
Authoritative answer – This is the answer that originates from the DNS Server which has the information about the zone file.
Non-authoritative answer – When a nameserver is not in the list for the domain you did a lookup on.
Different port – By default, the DNS servers use port 53.
30-day Free Trial for Premium Anycast DNS hosting
Hello! My name is Boyan Peychev, and I am the Founder and CEO of ClouDNS. I enjoy writing and sharing valuable information in a simple and easy-to-understand manner.


deprecated – should have the 10 most used used DIG commands.
Thanks! Already working on this. Article for DIG is coming soon!
“nslookup is deprecated”: Yeah, I’ve been hearing this for –literally– more than a decade now. In reality though, I’m still waiting to meet someone who actually uses dig instead of nslookup… So in my book, this article is extremely useful. 🙂
I use dig almost exclusively and require my Ops center people to use it when troubleshooting before I’ll answer questions for them. 😉 It would be really helpful if MS would put it in Windows, though…
can we know how many live ip address are using our local network by using nslookup commands? If yes, Please guide. Thank You
Hi Mithun, you can’t do this with nslookup.
Hi, can I find the subnet mask of an IP with NSLookup ?
No – masking is a function of routing not Name Resolution.
Very useful commands. 🙂