Suhas Somnath
University of Illinois Urbana-Champaign
Last Updated: 3/01/2012
Contents
This software suite provides the capability to perform experiments such as thermal nanolithography and thermal topography imaging using heated micro-cantilevers via the hardware and software of Asylum Research AFMs. This software suite controls cantilever temperature in closed loop feedback using the AFM controller’s electronics to improve lithography and imaging performance of heated cantilevers.
- Somnath, Suhas, Elise A. Corbin, and William P. King. "Improved nanotopography sensing via temperature control of a heated atomic force microscope cantilever." IEEE Sensors Journal 11, no. 11 (2011): 2664-2670.
- Kim, Hoe Joon, Nicolaie Moldovan, Jonathan R. Felts, Suhas Somnath, Zhenting Dai, Tevis DB Jacobs, Robert W. Carpick, John A. Carlisle, and William P. King. "Ultrananocrystalline diamond tip integrated onto a heated atomic force microscope cantilever." Nanotechnology 23, no. 49 (2012): 495302.
- Liu, Joseph O., Suhas Somnath, and William P. King. "Heated atomic force microscope cantilever with high resistivity for improved temperature sensitivity." Sensors and Actuators A: Physical 201 (2013): 141-147.
- Somnath, Suhas, and William P. King. "An investigation of heat transfer between a microcantilever and a substrate for improved thermal topography imaging." Nanotechnology 25, no. 36 (2014): 365501.
- Somnath, Suhas, Joseph O. Liu, Mete Bakir, Craig B. Prater, and William P. King. "Multifunctional atomic force microscope cantilevers with Lorentz force actuation and self-heating capability." Nanotechnology 25, no. 39 (2014): 395501.
This code is foreign to the existing AFM software. I have worked around many issues painstakingly to ensure that this code works as smoothly as possible. In the same manner, care has been taken to ensure that the normal AFM operation is not thwarted in any way. Sometimes, when this package is started up but not used actively, certain native operations of the AFM software tend to take back certain resources that were allocated for this code. This may manifest in the form of malfunctioning temperature control meters, stoppage in the PID controlling the cantilever temperature, etc. None of these should damage the cantilever in anyway. To resume normal operation of this code when necessary, use the reinitialize / refresh buttons provided. Typically, clicking on the start button is sufficient to bring things back to normal. This code has been tested extensively and its use has so far never resulted in any damage to the cantilever or the sample but please be careful when using this code and be mindful of the fact that this code is still foreign to the native AFM software.
This software was written from 2009 - 2012 and I provide no guarantee / fixes for making it work today.
- Igor Pro 6.1 or later
- Asylum Research software version: MFP3D 090909+xxxx or later
Asylum Research MFP-3D or Cypher AFM
Voltage follower circuit breaker - only for AFM Controllers prior to ARC 2 (2011 Jan or before)
Silicon Self-heating cantilevers from:
- UIUC - Prof. William P. King or
- Anasys Instruments - Thermalever AN200 / AN300 probes - sold commercially
Please make sure to use the voltage follower box specially constructed to circumvent the impedance matching problem of older Asylum Research AFM controllers for this code to work accurately.
1. Connect the Expansion port (25 pin serial) on the AFM controller to
the Voltage follower box
2. Connect VS (voltage across RS) to the in0 labeled
on the voltage follower box
3. Connect VT to the in1 labeled on the voltage follower box
and to BNCout0 on the AFM controller. You can use a BNC T-split for
this.
- Copy the
TemperatureControl.ipffile into theUserIncludesfolder so that this procedure file is compiled after the AFM software. - Copy the hacks present in each Asylum source code file in the
hooksfolder to the corresponding file used by your AFM.- I have used comments with my name to delineate the start and ends of each hack
- Search for
Suhasto find each of the modifications - Modify your file accordingly.
- Accessing the Heated Cantilever Suite: In the top
menu barof the AFM software:UIUC>>Heated Cantilever Suite>>
- This package is accessed by clicking on
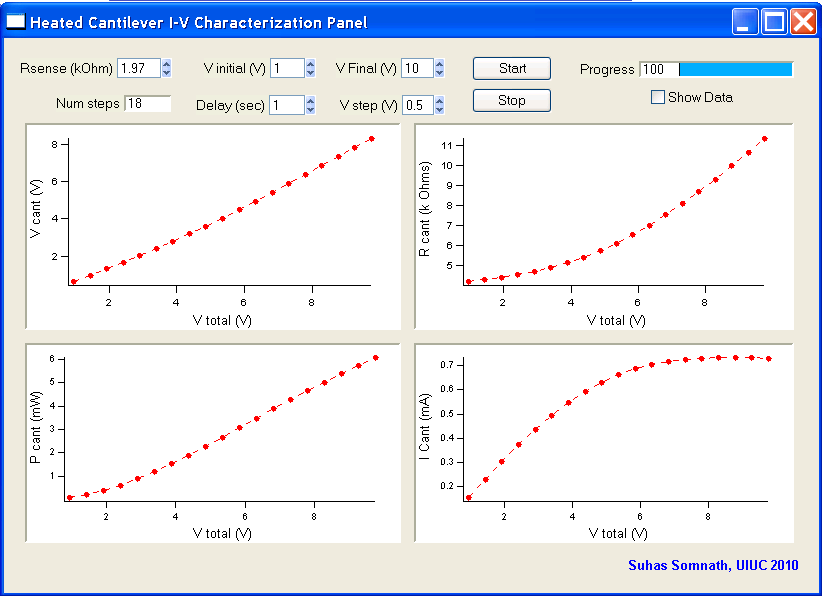
UIUC>>Heated Cantilever Suite>>I-V Characterization. - This package lets you electrically characterize the probe by linearly ramping the voltage being applied across the heating circuit.
R sense (k Ohm): The resistance of the sense resistor inkΩ. You can apply at most10Vwith this setup so choose your sense resistor that will allow you to access the cantilever temperatures you are interested in. I advise you to pick sense resistors in the range of1to5 kΩ. The value entered here will persist throughout the AFM software.V initial (V):Initial voltage to be applied across the circuit (0V <=V initial<10V). Lower ranges of voltage (0-1V) are typically less reliable. 1V should be just fine.V final (V): Maximum voltage that will be applied across the circuit (0V <V final<= 10V). I advise you to start with something small like2Vand go as high as necessary.Delay (sec): Time delay in seconds between measurement points. Larger the delay, greater the number of points of data being averaged. Any time greater than 1 sec will not necessarily improve the accuracy of the results greatly. Ensure that the delay is at least250 msec.V step (V): Incremental voltage being applied across the circuit between measurement points.Show data:If this is left checked, a table will pop up with the results of the IV characterization.
- Once the above parameters are specified, you may click the ‘Start’ button. If it does nothing on the first click, click it again.
- In the event that you want to stop the ramp at any time, you can do so by clicking the "Stop" button.
- Four graphs are updated in real time as each measurement point is acquired. Due to the nature of Igor Pro, the data may appear in an awkward manner because Igor Pro considers (0,0) as a point of measurement even if it is a virtual point on the graph. This will disappear and the data will look the way it should once the ramp is completed.
- The four graphs display circuit properties against actual bias
applied across the circuit and are as follows in anti-clockwise
direction:
- Cantilever resistance
- Voltage across the cantilever
- Power supplied to the cantilever
- Current through the cantilever
- This panel is initialized automatically when either the
Thermal LithographyorThermal Imagingwindows are accessed. - This panel can be accessed by clicking on
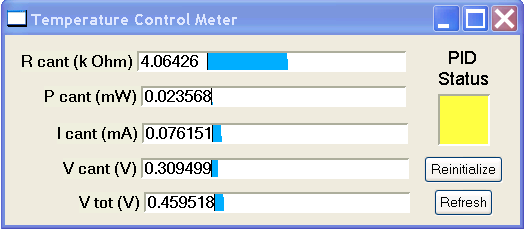
UIUC>>Heated Cantilever Suite>>Meter Panel - This panel provides real-time information about the cantilever’s resistance, power dissipation, voltage across the circuit, current through the circuit, etc.
Reinitialize: This button reinitializes the code necessary to run this panelRefresh: This button can be used in the rare event that the data in the meter stops refreshing.PID Status: This LED provides the status of thePID loopthat maintains the cantilever temperature constant:- Green: PID loop running
- Yellow: PID loop Initialized but not running
- Red: PID loop disabled.
- This package is accessed by clicking on
UIUC>>Heated Cantilever Suite>>Thermal Lithography - This window allows you to perform thermal lithography with a heated
cantilever. The lithography lines / patterns drawn either using
Microangeloor SmartLitho can be synchronized if appropriate triggers are inserted into Asylum's code. With the trigger code inserted, this package is capable of switching the cantilever's temperature from warm to hot and vice-versa when performing lithography. - Once this package is accessed, the
Temperature Control Meterpanel starts up as well.
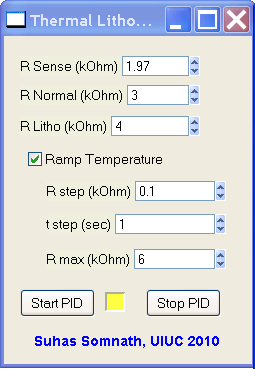
R sense (k Ohm):The resistance of the sense resistor in kilo ohms. See notes on the I-V characterization section for more details.R Normal (k Ohm):This is the cantilever's resistance setpoint to be maintained when NOT performing lithography.R Litho (k Ohm):This is the cantilever resistance setpoint to be maintained when performing lithography.Start PID:This initializes and starts the PID loop that controls the cantilever temperature. Start the PID just before performing lithography and then clickDo Lithoin theLitho Panelto perform lithography. The cantilever will not be heated unless the PID is started. When the PID is started, the square window to the right of the Start PID button will turn green indicating that the PID is currently maintaining constant cantilever temperature.Stop PID:Should the experiment go awry for some reason, you can use this button to stop the heating. If the experiment proceeds normally, the heating will be discontinued once the lithography is completed or the lithography is aborted by the user by clicking onStop Lithoin the Litho Panel.
Note - Due to limitations of Asylum's hardware & software, the above mentioned cantilever resistance set-points may not be maintained very accurately (although the precision is very good). For typical purposes, the inaccuracy should be acceptable. Use the meter panel to tweak the set-points until the desired set-point is reached in the meter panel.
Don't set the Rcant setpoint too close to the room temperature
resistance of the cantilever. This causes the PID control to approach a singularity. In this
case 0 V will be applied to the circuit. This will NOT result in damage to the
cantilever.
- This package also allows slow ramping of cantilever temperature while performing lithography. This feature is disabled by default.
- The cantilever temperature is ramped only while performing lithography and not in between lines. Once the lithography of the current line / feature is completed and that of the next line starts, the temperature ramp starts from the beginning again.
- The ramp starts with the specified
R Lithoand ramps up toR max. Ramp Temperature: This needs to be checked to enable ramping of temperature during lithographyT step (sec): This is the time delay before the cantilever temperature is incrementedR max (k Ohm): This is the maximum cantilever electrical resistance up to which the cantilever temperature will be ramped and henceforth held constant till the lithography of the current feature ends.
- This package is accessed by clicking on
UIUC>>Heated Cantilever Suite>>Thermal Imaging - This window allows you to perform thermal topography imaging with a heated cantilever.
- Once this package is accessed, the
Temperature Control Meterpanel starts up as well.
R sense (k Ohm):The resistance of the sense resistor in kilo ohms. See notes on theI-V characterizationsection for more details.R cant (k Ohm):This is the cantilever's resistance setpoint to be maintained when performing topography imaging.Scan Mode:This allows the user to choose the mode of actuation of the cantilever when imaging. The lateral channel has been used to display the voltage across the cantilever. This imaging window should be initialized automatically. Setting the mode of imaging here allows the software to set up the imaging windows among other parameters accordingly:Thermal Feedback:This is a beta testing feature. Please don’t use this. Instead, please use the contact mode and tapping modes of imaging only.
Start PID:This initializes and starts the PID loop that controls the cantilever temperature. Start the PID just before performing imaging and then clickDo Scanin theMaster Panelto perform topography imaging. The cantilever will not be heated unless the PID is started. When the PID is started, the square window to the right of the Start PID button will turn green indicating that the PID is currently maintaining constant cantilever temperature.Stop PID:Should the experiment go awry for some reason, you can use this button to stop the heating. If the experiment proceeds normally, the heating will be discontinued once the imaging is completed or the imaging is aborted by the user by clicking onStop Scanin theMaster Panel.


