[go: up one dir, main page]

#1 Get the pieces

This guide relies on software which is freely licensed; it's completely transparent and anyone can copy it or make their own version. This makes it safer from surveillance than proprietary software (like Windows or macOS). Learn more about free software at fsf.org.

Most GNU/Linux operating systems come with GnuPG installed on them, so if you're running one of these systems, you don't have to download it. If you're running macOS or Windows, steps to download GnuPG are below. Before configuring your encryption setup with this guide, though, you'll need a desktop email program installed on your computer. Many GNU/Linux distributions have one installed already, such as Icedove, which may be under the alternate name "Thunderbird." Programs like these are another way to access the same email accounts you can access in a browser (like Gmail), but provide extra features.

Step 1.a Set up your email program with your email account

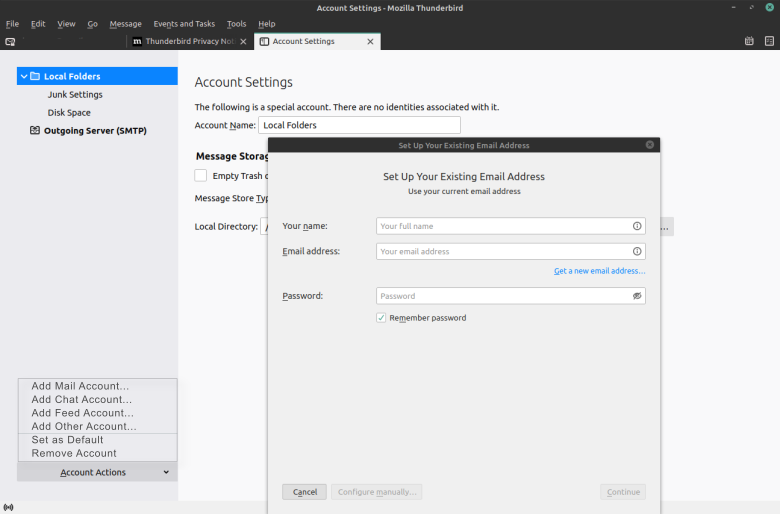
Open your email program and follow the wizard (step-by-step walkthrough) that sets it up with your email account. This usually starts from "Account Settings" → "Add Mail Account". You should get the email server settings from your systems administrator or the help section of your email account.

Troubleshooting

The wizard doesn't launch
You can launch the wizard yourself, but the menu option for doing so is named differently in each email program. The button to launch it will be in the program's main menu, under "New" or something similar, titled something like "Add account" or "New/Existing email account."
The wizard can't find my account or isn't downloading my mail
Before searching the Web, we recommend you start by asking other people who use your email system, to figure out the correct settings.
I can't find the menu
In many new email programs, the main menu is represented by an image of three stacked horizontal bars.

Step 1.b Install GnuPG

If you are using a GNU/Linux machine, you should already have GnuPG installed, and you can skip to Section 2.

If you are using a macOS or Windows machine, however, you need to first install the GnuPG program. Select your operating system below and follow the instructions. For the rest of this guide, the steps are the same for all operating systems.

macOS

Use a third-party package manager to install GnuPG

The default macOS package manager makes it difficult to install GnuPG and other pieces of free software (like Emacs, GIMP, or Inkscape). To make things easier, we recommend setting up the third-party package manager "Homebrew" to install GnuPG. For this, we will use a program called "Terminal," which is pre-installed on macOS.

# Copy the first command on the home page of Homebrew by clicking on the clipboard icon, and paste it in Terminal. Click "Enter" and wait for the installation to finalize.

# Then install GnuPG by entering the following code in Terminal:
brew install gnupg gnupg2

Windows

Get GnuPG by downloading GPG4Win

GPG4Win is an email and file encryption software package that includes GnuPG. Download and install the latest version, choosing default options whenever asked. After it's installed, you can close any windows that it creates.

GnuPG, OpenPGP, what?

In general, the terms GnuPG, GPG, GNU Privacy Guard, OpenPGP and PGP are used interchangeably. Technically, OpenPGP (Pretty Good Privacy) is the encryption standard, and GNU Privacy Guard (often shortened to GPG or GnuPG) is the program that implements the standard. Most email programs provide an interface for GnuPG. There is also a newer version of GnuPG, called GnuPG2.

#2 Make your keys

A robot with a head shaped like a key holding a private and a public key

To use the GnuPG system, you'll need a public key and a private key (known together as a keypair). Each is a long string of randomly generated numbers and letters that are unique to you. Your public and private keys are linked together by a special mathematical function.

Your public key isn't like a physical key, because it's stored in the open in an online directory called a keyserver. People download it and use it, along with GnuPG, to encrypt emails they send to you. You can think of the keyserver as a phonebook; people who want to send you encrypted email can look up your public key.

Your private key is more like a physical key, because you keep it to yourself (on your computer). You use GnuPG and your private key together to descramble encrypted emails other people send to you. You should never share your private key with anyone, under any circumstances.

In addition to encryption and decryption, you can also use these keys to sign messages and check the authenticity of other people's signatures. We'll discuss this more in the next section.

Step 2.a Make a keypair

Make your keypair

We will use the command line in a terminal to create a keypair using the GnuPG program.

Whether on GNU/Linux, macOS or Windows, you can launch your terminal ("Terminal" in macOS, "PowerShell" in Windows) from the Applications menu (some GNU/Linux systems respond to the Ctrl + Alt + T shortcut).

# Enter gpg --full-generate-key to start the process.

# To answer what kind of key you would like to create, select the default option: 1 RSA and RSA.

# Enter the following keysize: 4096 for a strong key.

# Choose the expiration date; we suggest 2y (2 years).

Follow the prompts to continue setting up with your personal details.

Depending on your version of GPG, you may need to use --gen-key instead of --full-generate-key.

You can set further options by running gpg --edit-key [your@email] in a terminal window.

Set your passphrase

On the screen titled "Passphrase," pick a strong passphrase! You can do it manually, or you can use the Diceware method. Doing it manually is faster but not as secure. Using Diceware takes longer and requires dice, but creates a passphrase that is much harder for attackers to figure out. To use it, read the section "Make a secure passphrase with Diceware" in this article by Micah Lee.

If you'd like to pick a passphrase manually, come up with something you can remember which is at least twelve characters long, and includes at least one lower case and upper case letter and at least one number or punctuation symbol. Never pick a passphrase you've used elsewhere. Don't use any recognizable patterns, such as birthdays, telephone numbers, pets' names, song lyrics, quotes from books, and so on.

Troubleshooting

GnuPG is not installed
You can check if this is the case with the command gpg --version. If GnuPG is not installed, it will bring up the following result on most GNU/Linux operating systems, or something like it: Command 'gpg' not found, but can be installed with: sudo apt install gnupg. Follow that command and install the program.
gpg --full-generate-key command not working
Some distributions use a different version of GPG. When you receive an error code that is something along the lines of: gpg: Invalid option "--full-generate-key", you can try the following commands:
sudo apt update
sudo apt install gnupg2
gpg2 --full-generate-key
If this resolved the issue, you need to continue to use the gpg2 identifier instead of gpg throughout the following steps of the guide.

Depending on your version of GPG, you may need to use --gen-key instead of --full-generate-key.

I took too long to create my passphrase
That's okay. It's important to think about your passphrase. When you're ready, just follow the steps from the beginning again to create your key.
How can I see my key?
Use the following command to see all keys: gpg --list-keys. Yours should be listed in there, and later, so will Edward's (Section 3).
If you want to see only your key, you can use gpg --list-key [your@email].
You can also use gpg --list-secret-key to see your own private key.
More resources
For more information about this process, you can also refer to The GNU Privacy Handbook. Make sure you stick with "RSA and RSA" (the default), because it's newer and more secure than the algorithms the documentation recommends. Also make sure your key is at least 4096 bits if you want to be secure.

Advanced

Advanced key pairs
When GnuPG creates a new keypair, it compartmentalizes the encryption function from the signing function through subkeys. If you use subkeys carefully, you can keep your GnuPG identity more secure and recover from a compromised key much more quickly. Alex Cabal and the Debian wiki provide good guides for setting up a secure subkey configuration.

Step 2.b Some important steps following creation

Upload your key to a keyserver

We will upload your key to a keyserver, so if someone wants to send you an encrypted message, they can download your public key from the Internet. There are multiple keyservers that you can select from the menu when you upload, but they are mostly all copies of each other. Any server will work, but it's good to remember which one you uploaded your key to originally. Also keep in mind, sometimes takes a few hours for them to match each other when a new key is uploaded.

# Copy your keyID: gpg --list-key [your@email] will list your public ("pub") key information, including your keyID, which is a unique list of numbers and letters. Copy this keyID, so you can use it in the following command.

# Upload your key to a server: gpg --send-key [keyID]

Export your key to a file

Use the following command to export your secret key so you can import it into your email client at the next step. To avoid getting your key compromised, store this in a safe place, and make sure that if it is transferred, it is done so in a trusted way. Exporting your keys can be done with the following commands:

$ gpg --export-secret-keys -a [keyID] > my_secret_key.asc
$ gpg --export -a [keyID] > my_public_key.asc

Generate a revocation certificate

Just in case you lose your key, or it gets compromised, you want to generate a certificate and choose to save it in a safe place on your computer for now (please refer to Step 6.C for how to best store your revocation cerficate safely). This step is essential for your email self-defense, as you'll learn more about in Section 5.

# Copy your keyID: gpg --list-key [your@email] will list your public ("pub") key information, including your keyID, which is a unique list of numbers and letters. Copy this keyID, so you can use it in the following command.

# Generate a revocation certificate: gpg --gen-revoke --output revoke.asc [keyID]

# It will prompt you to give a reason for revocation, we recommend to use 1 = key has been compromised.

# You don't have to fill in a reason, but you can; then press "Enter" for an empty line, and confirm your selection.

Troubleshooting

Sending my key to the keyserver is not working
Instead of using the general command to upload your key to the keyserver, you can use a more specific command and add the keyserver to your command gpg --keyserver keys.openpgp.org --send-key [keyID].
My key doesn't seem to be working or I get a "permission denied."

Like every other file or folder, gpg keys are subject to permissions. If these are not set correctly, your system may not be accepting your keys. You can follow the next steps to check, and update to the right permissions.

# Check your permissions: ls -l ~/.gnupg/*

# Set permissions to read, write, execute for only yourself, no others. These are the recommended permissions for your folder.
You can use the command: chmod 700 ~/.gnupg

# Set permissions to read and write for yourself only, no others. These are the recommended permissions for the keys inside your folder.
You can use the code: chmod 600 ~/.gnupg/*

If you have (for any reason) created your own folders inside ~/.gnupg, you must also additionally apply execute permissions to that folder. Folders require execution privileges to be opened. For more information on permissions, you can check out this detailed information guide.

Advanced

More about keyservers
You can find some more keyserver information in this manual. You can also directly export your key as a file on your computer.
Transferring your keys

Use the following commands to transfer your keys. To avoid getting your key compromised, store it in a safe place, and make sure that if it is transferred, it is done so in a trusted way. Importing and exporting a key can be done with the following commands:

$ gpg --export-secret-keys -a [keyID] > my_private_key.asc
$ gpg --export -a [keyID] > my_public_key.asc
$ gpg --import my_private_key.asc
$ gpg --import my_public_key.asc

Ensure that the keyID printed is the correct one, and if so, then go ahead and add ultimate trust for it:

$ gpg --edit-key [your@email]

Because this is your key, you should choose ultimate. You shouldn't trust anyone else's key ultimately.

Refer to Troubleshooting in Step 2.B for more information on permissions. When transferring keys, your permissions may get mixed, and errors may be prompted. These are easily avoided when your folders and files have the right permissions

#3 Set up email encryption

The Icedove (or Thunderbird) email program has PGP functionality integrated, which makes it pretty easy to work with. We'll take you through the steps of integrating and using your key in these email clients.

Step 3.a Set up your email with encryption

Once you have set up your email with encryption, you can start contributing to encrypted traffic on the Internet. First we'll get your email client to import your secret key, and we will also learn how to get other people's public keys from servers so you can send and receive encrypted email.

# Open your email client and use "Tools" → OpenPGP Key Manager

# Under "File" → Import Secret Key(s) From File

# Select the file you saved under the name [my_secret_key.asc] in Step 2.B when you exported your key

# Unlock with your passphrase

# You will receive a "OpenPGP keys successfully imported" window to confirm success

# Go to "Account settings" → "End-To-End Encryption," and make sure your key is imported and select Treat this key as a Personal Key.

Troubleshooting

I'm not sure the import worked correctly
Look for "Account settings" → "End-To-End Encryption." Here you can see if your personal key associated with this email is found. If it is not, you can try again via the Add key option. Make sure you have the correct, active, secret key file.

#4 Try it out!

Illustration of a person in a house with a cat connected to a server

Now you'll try a test correspondence with an FSF computer program named Edward, who knows how to use encryption. Except where noted, these are the same steps you'd follow when corresponding with a real, live person.

Step 4.a Send Edward your public key

This is a special step that you won't have to do when corresponding with real people. In your email program's menu, go to "Tools" → "OpenPGP Key Manager." You should see your key in the list that pops up. Right click on your key and select Send Public Keys by Email. This will create a new draft message, as if you had just hit the "Write" button, but in the attachment you will find your public keyfile.

Address the message to edward-en@fsf.org. Put at least one word (whatever you want) in the subject and body of the email. Don't send yet.

We want Edward to be able to open the email with your keyfile, so we want this first special message to be unencrypted. Make sure encryption is turned off by using the dropdown menu "Security" and select Do Not Encrypt. Once encryption is off, hit Send.

It may take two or three minutes for Edward to respond. In the meantime, you might want to skip ahead and check out the Use it Well section of this guide. Once you have received a response, head to the next step. From here on, you'll be doing just the same thing as when corresponding with a real person.

When you open Edward's reply, GnuPG may prompt you for your passphrase before using your private key to decrypt it.

Step 4.b Send a test encrypted email

Get Edward's key

To encrypt an email to Edward, you need its public key, so now you'll have to download it from a keyserver. You can do this in two different ways:

Option 1. In the email answer you received from Edward as a response to your first email, Edward's public key was included. On the right of the email, just above the writing area, you will find an "OpenPGP" button that has a lock and a little wheel next to it. Click that, and select Discover next to the text: "This message was signed with a key that you don't yet have." A popup with Edward's key details will follow.

Option 2. Open your OpenPGP Key manager, and under "Keyserver" choose Discover Keys Online. Here, fill in Edward's email address, and import Edward's key.

The option Accepted (unverified) will add this key to your key manager, and now it can be used to send encrypted emails and to verify digital signatures from Edward.

In the popup window confirming if you want to import Edward's key, you'll see many different emails that are all associated with its key. This is correct; you can safely import the key.

Since you encrypted this email with Edward's public key, Edward's private key is required to decrypt it. Edward is the only one with its private key, so no one except Edward can decrypt it.

Send Edward an encrypted email

Write a new email in your email program, addressed to edward-en@fsf.org. Make the subject "Encryption test" or something similar and write something in the body.

This time, make sure encryption is turned on by using the dropdown menu "Security" and select Require Encryption. Once encryption is on, hit Send.

Troubleshooting

"Recipients not valid, not trusted or not found"
You could get the above error message, or something along these lines: "Unable to send this message with end-to-end encryption, because there are problems with the keys of the following recipients: ..." In these cases, you may be trying to send an encrypted email to someone when you do not have their public key yet. Make sure you follow the steps above to import the key to your key manager. Open the OpenPGP Key Manager to make sure the recipient is listed there.
Unable to send message
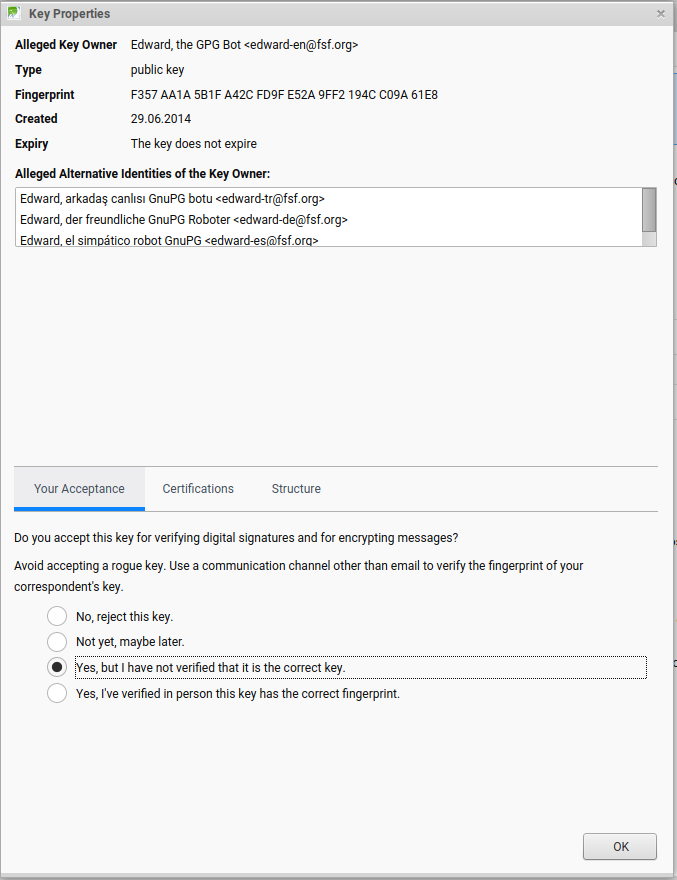
You could get the following message when trying to send your encrypted email: "Unable to send this message with end-to-end encryption, because there are problems with the keys of the following recipients: edward-en@fsf.org." This usually means you imported the key with the "Not accepted (undecided)" option. Go to the "key properties" of this key by right clicking on the key in the OpenPGP Key Manager, and select the option Yes, but I have not verified that this is the correct key in the "Acceptance" option at the bottom of this window. Resend the email.
I can't find Edward's key
Close the pop-ups that have appeared since you clicked Send. Make sure you are connected to the Internet and try again. If that doesn't work, you can download the key manually from the keyserver, and import it by using the Import Public Key(s) from File option in the OpenPGP Key Manager.
Unscrambled messages in the Sent folder
Even though you can't decrypt messages encrypted to someone else's key, your email program will automatically save a copy encrypted to your public key, which you'll be able to view from the Sent folder like a normal email. This is normal, and it doesn't mean that your email was not sent encrypted.

Advanced

Encrypt messages from the command line
You can also encrypt and decrypt messages and files from the command line, if that's your preference. The option --armor makes the encrypted output appear in the regular character set.

Important: Security tips

Even if you encrypt your email, the subject line is not encrypted, so don't put private information there. The sending and receiving addresses aren't encrypted either, so a surveillance system can still figure out who you're communicating with. Also, surveillance agents will know that you're using GnuPG, even if they can't figure out what you're saying. When you send attachments, you can choose to encrypt them or not, independent of the actual email.

For greater security against potential attacks, you can turn off HTML. Instead, you can render the message body as plain text. In order to do this in Icedove or Thunderbird, go to "View" → "Message Body As" → Plain Text.

Step 4.c Receive a response

When Edward receives your email, it will use its private key to decrypt it, then reply to you.

It may take two or three minutes for Edward to respond. In the meantime, you might want to skip ahead and check out the Use it Well section of this guide.

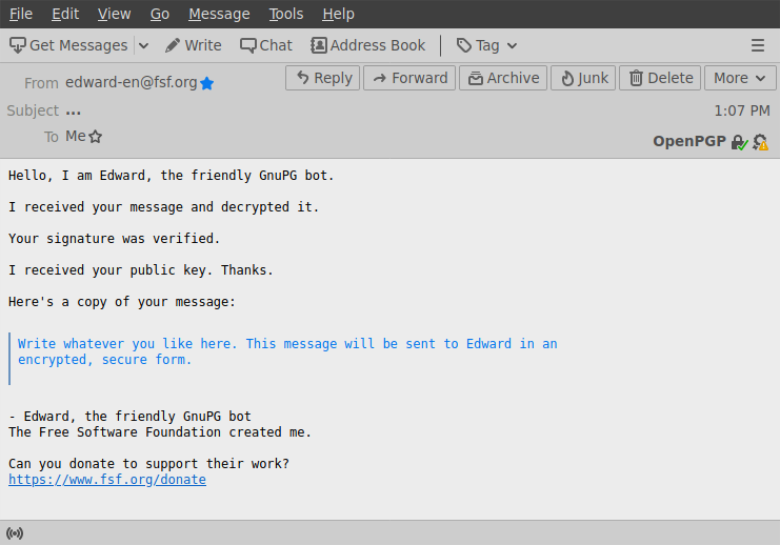
Edward will send you an encrypted email back saying your email was received and decrypted. Your email client will automatically decrypt Edward's message.

The OpenPGP button in the email will show a little green checkmark over the lock symbol to show the message is encrypted, and a little orange warning sign which means that you have accepted the key, but not verified it. When you have not yet accepted the key, you will see a little question mark there. Clicking the prompts in this button will lead you to key properties as well.

Step 4.d Send a signed test email

GnuPG includes a way for you to sign messages and files, verifying that they came from you and that they weren't tampered with along the way. These signatures are stronger than their pen-and-paper cousins -- they're impossible to forge, because they're impossible to create without your private key (another reason to keep your private key safe).

You can sign messages to anyone, so it's a great way to make people aware that you use GnuPG and that they can communicate with you securely. If they don't have GnuPG, they will be able to read your message and see your signature. If they do have GnuPG, they'll also be able to verify that your signature is authentic.

To sign an email to Edward, compose any message to the email address and click the pencil icon next to the lock icon so that it turns gold. If you sign a message, GnuPG may ask you for your passphrase before it sends the message, because it needs to unlock your private key for signing.

In "Account Settings" → "End-To-End-Encryption" you can opt to add digital signature by default.

Step 4.e Receive a response

When Edward receives your email, he will use your public key (which you sent him in Step 3.A) to verify the message you sent has not been tampered with and to encrypt a reply to you.

It may take two or three minutes for Edward to respond. In the meantime, you might want to skip ahead and check out the Use it Well section of this guide.

Edward's reply will arrive encrypted, because he prefers to use encryption whenever possible. If everything goes according to plan, it should say "Your signature was verified." If your test signed email was also encrypted, he will mention that first.

When you receive Edward's email and open it, your email client will automatically detect that it is encrypted with your public key, and then it will use your private key to decrypt it.

#5 Learn about the Web of Trust

Illustration of keys all interconnected with a web of lines

Email encryption is a powerful technology, but it has a weakness: it requires a way to verify that a person's public key is actually theirs. Otherwise, there would be no way to stop an attacker from making an email address with your friend's name, creating keys to go with it, and impersonating your friend. That's why the free software programmers that developed email encryption created keysigning and the Web of Trust.

When you sign someone's key, you are publicly saying that you've verified that it belongs to them and not someone else.

Signing keys and signing messages use the same type of mathematical operation, but they carry very different implications. It's a good practice to generally sign your email, but if you casually sign people's keys, you may accidentally end up vouching for the identity of an imposter.

People who use your public key can see who has signed it. Once you've used GnuPG for a long time, your key may have hundreds of signatures. You can consider a key to be more trustworthy if it has many signatures from people that you trust. The Web of Trust is a constellation of GnuPG users, connected to each other by chains of trust expressed through signatures.

Step 5.a Sign a key

In your email program's menu, go to OpenPGP Key Manager and select Key properties by right clicking on Edward's key.

Under "Your Acceptance," you can select Yes, I've verified in person this key has the correct fingerprint.

You've just effectively said "I trust that Edward's public key actually belongs to Edward." This doesn't mean much because Edward isn't a real person, but it's good practice, and for real people it is important. You can read more about signing a person's key in the check IDs before signing section.

Identifying keys: Fingerprints and IDs

People's public keys are usually identified by their key fingerprint, which is a string of digits like F357AA1A5B1FA42CFD9FE52A9FF2194CC09A61E8 (for Edward's key). You can see the fingerprint for your public key, and other public keys saved on your computer, by going to OpenPGP Key Management in your email program's menu, then right clicking on the key and choosing Key Properties. It's good practice to share your fingerprint wherever you share your email address, so that people can double-check that they have the correct public key when they download yours from a keyserver.

You may also see public keys referred to by a shorter keyID. This keyID is visible directly from the Key Management window. These eight character keyIDs were previously used for identification, which used to be safe, but is no longer reliable. You need to check the full fingerprint as part of verifying you have the correct key for the person you are trying to contact. Spoofing, in which someone intentionally generates a key with a fingerprint whose final eight characters are the same as another, is unfortunately common.

Important: What to consider when signing keys

Before signing a person's key, you need to be confident that it actually belongs to them, and that they are who they say they are. Ideally, this confidence comes from having interactions and conversations with them over time, and witnessing interactions between them and others. Whenever signing a key, ask to see the full public key fingerprint, and not just the shorter keyID. If you feel it's important to sign the key of someone you've just met, also ask them to show you their government identification, and make sure the name on the ID matches the name on the public key.

Advanced

Master the Web of Trust
Unfortunately, trust does not spread between users the way many people think. One of the best ways to strengthen the GnuPG community is to deeply understand the Web of Trust and to carefully sign as many people's keys as circumstances permit.

#6 Use it well

Everyone uses GnuPG a little differently, but it's important to follow some basic practices to keep your email secure. Not following them, you risk the privacy of the people you communicate with, as well as your own, and damage the Web of Trust.

When should I encrypt? When should I sign?

The more you can encrypt your messages, the better. If you only encrypt emails occasionally, each encrypted message could raise a red flag for surveillance systems. If all or most of your email is encrypted, people doing surveillance won't know where to start. That's not to say that only encrypting some of your email isn't helpful -- it's a great start and it makes bulk surveillance more difficult.

Unless you don't want to reveal your own identity (which requires other protective measures), there's no reason not to sign every message, whether or not you are encrypting. In addition to allowing those with GnuPG to verify that the message came from you, signing is a non-intrusive way to remind everyone that you use GnuPG and show support for secure communication. If you often send signed messages to people that aren't familiar with GnuPG, it's nice to also include a link to this guide in your standard email signature (the text kind, not the cryptographic kind).

Be wary of invalid keys

GnuPG makes email safer, but it's still important to watch out for invalid keys, which might have fallen into the wrong hands. Email encrypted with invalid keys might be readable by surveillance programs.

In your email program, go back to the first encrypted email that Edward sent you. Because Edward encrypted it with your public key, it will have a green checkmark on the "OpenPGP" button.

When using GnuPG, make a habit of glancing at that button. The program will warn you there if you get an email signed with a key that can't be trusted.

Copy your revocation certificate to somewhere safe

Remember when you created your keys and saved the revocation certificate that GnuPG made? It's time to copy that certificate onto the safest storage that you have -- a flash drive, disk, or hard drive stored in a safe place in your home could work, not on a device you carry with you regularly. The safest way we know is actually to print the revocation certificate and store it in a safe place.

If your private key ever gets lost or stolen, you'll need this certificate file to let people know that you are no longer using that keypair.

IMPORTANT: ACT SWIFTLY if someone gets your private key

If you lose your private key or someone else gets a hold of it (say, by stealing or cracking your computer), it's important to revoke it immediately before someone else uses it to read your encrypted email or forge your signature. This guide doesn't cover how to revoke a key, but you can follow these instructions. After you're done revoking, make a new key and send an email to everyone with whom you usually use your key to make sure they know, including a copy of your new key.

Webmail and GnuPG

When you use a web browser to access your email, you're using webmail, an email program stored on a distant website. Unlike webmail, your desktop email program runs on your own computer. Although webmail can't decrypt encrypted email, it will still display it in its encrypted form. If you primarily use webmail, you'll know to open your email client when you receive a scrambled email.

Make your public key part of your online identity

First add your public key fingerprint to your email signature, then compose an email to at least five of your friends, telling them you just set up GnuPG and mentioning your public key fingerprint. Link to this guide and ask them to join you. Don't forget that there's also an awesome infographic to share.

Start writing your public key fingerprint anywhere someone would see your email address: your social media profiles, blog, Website, or business card. (At the Free Software Foundation, we put ours on our staff page.) We need to get our culture to the point that we feel like something is missing when we see an email address without a public key fingerprint.