Train a machine learning model using Amazon SageMaker
This sample project demonstrates how to use SageMaker and AWS Step Functions to train a machine learning model and how to batch transform a test dataset.
In this project, Step Functions uses a Lambda function to seed an Amazon S3 bucket with a test dataset. It then trains a machine learning model and performs a batch transform, using the SageMaker service integration.
For more information about SageMaker and Step Functions service integrations, see the following:
Note
This sample project may incur charges.
For new AWS users, a free usage tier is available. On this tier, services are free below
a certain level of usage. For more information about AWS costs and the Free Tier, see SageMaker Pricing
Step 1: Create the state machine
-
Open the Step Functions console
and choose Create state machine. -
Type
Train a machine learning modelin the search box, and then choose Train a machine learning model from the search results that are returned. -
Choose Next to continue.
-
Choose Run a demo to create a read-only and ready-to-deploy workflow, or choose Build on it to create an editable state machine definition that you can build on and later deploy.
This sample project deploys the following resources:
-
An AWS Lambda function
-
An Amazon Simple Storage Service (Amazon S3) bucket
-
An AWS Step Functions state machine
-
Related AWS Identity and Access Management (IAM) roles
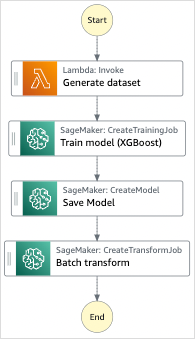
The following image shows the workflow graph for the Train a machine learning model sample project:
-
-
Choose Use template to continue with your selection.
Next steps depend on your previous choice:
-
Run a demo – You can review the state machine before you create a read-only project with resources deployed by AWS CloudFormation to your AWS account.
You can view the state machine definition, and when you are ready, choose Deploy and run to deploy the project and create the resources.
Deploying can take up to 10 minutes to create resources and permissions. You can use the Stack ID link to monitor progress in AWS CloudFormation.
After deploy completes, you should see your new state machine in the console.
-
Build on it – You can review and edit the workflow definition. You might need to set values for placeholders in the sample project before attemping to run your custom workflow.
Note
Standard charges might apply for services deployed to your account.
Step 2: Run the state machine
-
On the State machines page, choose your sample project.
-
On the sample project page, choose Start execution.
-
In the Start execution dialog box, do the following:
-
(Optional) Enter a custom execution name to override the generated default.
Non-ASCII names and logging
Step Functions accepts names for state machines, executions, activities, and labels that contain non-ASCII characters. Because such characters will not work with Amazon CloudWatch, we recommend using only ASCII characters so you can track metrics in CloudWatch.
-
(Optional) In the Input box, enter input values as JSON. You can skip this step if you are running a demo.
-
Choose Start execution.
The Step Functions console will direct you to an Execution Details page where you can choose states in the Graph view to explore related information in the Step details pane.
-
Example State Machine Code
The state machine in this sample project integrates with SageMaker and AWS Lambda by passing parameters directly to those resources, and uses an Amazon S3 bucket for the training data source and output.
Browse through this example state machine to see how Step Functions controls Lambda and SageMaker.
For more information about how AWS Step Functions can control other AWS services, see Integrating services with Step Functions.
{
  "StartAt": "Generate dataset",
  "States": {
    "Generate dataset": {
      "Resource": "arn:aws:lambda:us-west-2:123456789012:function:TrainAndBatchTransform-SeedingFunction-17RNSOTG97HPV",
      "Type": "Task",
      "Next": "Train model (XGBoost)"
    },
    "Train model (XGBoost)": {
      "Resource": "arn:aws:states:::sagemaker:createTrainingJob.sync",
      "Parameters": {
        "AlgorithmSpecification": {
          "TrainingImage": "433757028032.dkr.ecr.us-west-2.amazonaws.com/xgboost:latest",
          "TrainingInputMode": "File"
        },
        "OutputDataConfig": {
          "S3OutputPath": "s3://amzn-s3-demo-source-bucket/models"
        },
        "StoppingCondition": {
          "MaxRuntimeInSeconds": 86400
        },
        "ResourceConfig": {
          "InstanceCount": 1,
          "InstanceType": "ml.m4.xlarge",
          "VolumeSizeInGB": 30
        },
        "RoleArn": "arn:aws:iam::123456789012:role/TrainAndBatchTransform-SageMakerAPIExecutionRole-Y9IX3DLF6EUO",
        "InputDataConfig": [
          {
            "DataSource": {
              "S3DataSource": {
                "S3DataDistributionType": "ShardedByS3Key",
                "S3DataType": "S3Prefix",
                "S3Uri": "s3://amzn-s3-demo-source-bucket/csv/train.csv"
              }
            },
            "ChannelName": "train",
            "ContentType": "text/csv"
          }
        ],
        "HyperParameters": {
          "objective": "reg:logistic",
          "eval_metric": "rmse",
          "num_round": "5"
        },
        "TrainingJobName.$": "$$.Execution.Name"
      },
      "Type": "Task",
      "Next": "Save Model"
    },
    "Save Model": {
      "Parameters": {
        "PrimaryContainer": {
          "Image": "433757028032.dkr.ecr.us-west-2.amazonaws.com/xgboost:latest",
          "Environment": {},
          "ModelDataUrl.$": "$.ModelArtifacts.S3ModelArtifacts"
        },
        "ExecutionRoleArn": "arn:aws:iam::123456789012:role/TrainAndBatchTransform-SageMakerAPIExecutionRole-Y9IX3DLF6EUO",
        "ModelName.$": "$.TrainingJobName"
      },
      "Resource": "arn:aws:states:::sagemaker:createModel",
      "Type": "Task",
      "Next": "Batch transform"
    },
    "Batch transform": {
      "Type": "Task",
      "Resource": "arn:aws:states:::sagemaker:createTransformJob.sync",
      "Parameters": {
        "ModelName.$": "$$.Execution.Name",
        "TransformInput": {
          "CompressionType": "None",
          "ContentType": "text/csv",
          "DataSource": {
            "S3DataSource": {
              "S3DataType": "S3Prefix",
              "S3Uri": "s3://amzn-s3-demo-source-bucket/csv/test.csv"
            }
          }
        },
        "TransformOutput": {
          "S3OutputPath": "s3://amzn-s3-demo-source-bucket/output"
        },
        "TransformResources": {
          "InstanceCount": 1,
          "InstanceType": "ml.m4.xlarge"
        },
        "TransformJobName.$": "$$.Execution.Name"
      },
      "End": true
    }
  }
}
For information about how to configure IAM when using Step Functions with other AWS services, see How Step Functions generates IAM policies for integrated services.
IAM Example
These example AWS Identity and Access Management (IAM) policies generated by the sample project include the least privilege necessary to execute the state machine and related resources. We recommend that you include only those permissions that are necessary in your IAM policies.
{
    "Version": "2012-10-17",
    "Statement": [
        {
            "Action": [
                "cloudwatch:PutMetricData",
                "logs:CreateLogStream",
                "logs:PutLogEvents",
                "logs:CreateLogGroup",
                "logs:DescribeLogStreams",
                "s3:GetObject",
                "s3:PutObject",
                "s3:ListBucket",
                "ecr:GetAuthorizationToken",
                "ecr:BatchCheckLayerAvailability",
                "ecr:GetDownloadUrlForLayer",
                "ecr:BatchGetImage"
            ],
            "Resource": "*",
            "Effect": "Allow"
        }
    ]
}
The following policy allows the Lambda function to seed the Amazon S3 bucket with sample data.
{
    "Version": "2012-10-17",
    "Statement": [
        {
            "Action": [
                "s3:PutObject"
            ],
            "Resource": "arn:aws:s3:::amzn-s3-demo-source-bucket/*",
            "Effect": "Allow"
        }
    ]
}
For information about how to configure IAM when using Step Functions with other AWS services, see How Step Functions generates IAM policies for integrated services.
